I posted in August about trying to get tether anchors retrofitted in my mother's 1999 Ford Escort Wagon. It originally began in April. There are still no tether anchors in my Mom's car. We went for our 3rd appointment last week. I found 1 of the holes in the ceiling, where the center tether anchors is supposed to be installed. That's all I needed really, just 1. We went to the dealership, only to find out they would NOT install the anchors correctly for us. Ford told them the ceiling isn't string enough. Yet my LATCH Manual (in which the authors spoke with engineers from all manufacturers), and the vehicle owner's manual say they belong in the ceiling. I have pictures from someone else that had her installed, in the ceiling. They still refused to do it, so I simply had them take them off the floor, since I know that's not where they belong.
I stuck 1 into the hole I found in the ceiling, and tightened it just enough so it doesn't fall out. All I need to do is find out from Ford how many pounds of torque are needed. I've called Ford Corporate, and left a message. I've also emailed one of the authors of the LATCH Manual, and she will check with her Ford contact.
So, I started in April, thinking we'd have plenty of time to get them installed before Sofi could ride forward facing, after she turned 4 in September. It's now Novemeber, and Sofi continues to ride rear facing in my Mom's car.
Saturday, November 27, 2010
Saturday, November 20, 2010
Do you have your screws?
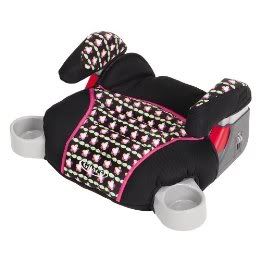
Do you have a Graco Turbobooster? For years, the Graco Turbobooster has come partially unassembled. You buy it, you have to put on the arm rests, then put in the screws. Many parents skip the screws. Why? Maybe because many parents don't read the manual, and the screws come attached to that. Maybe because they think the screws aren't really necessary. The newer TurboBoosters that are being sold have the screws pre-installed, but there are still some TurboBoosters being sold (such as the High Back Turbos or older ones that have not been sold yet) that do not have them installed. Or, you may already own a TurboBooster. Either way, be sure you have those screws in so your children can be riding safely!
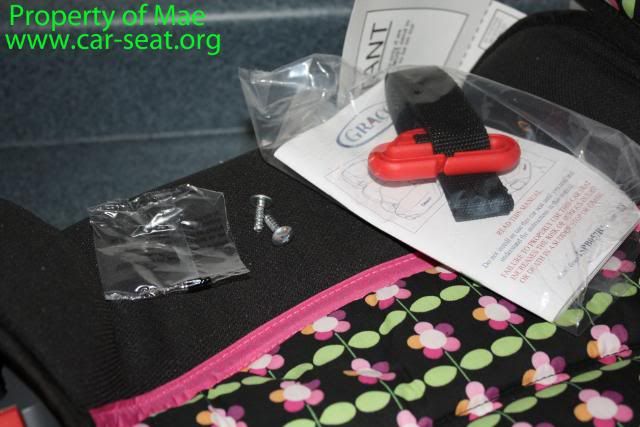
If you're thinking to yourself, "What screws???" Check out the pictures below.
This is the baggy that came with your Turbobooster. It contains the instruction manual, the shoulder belt positioner, and a bag of 2 screws.
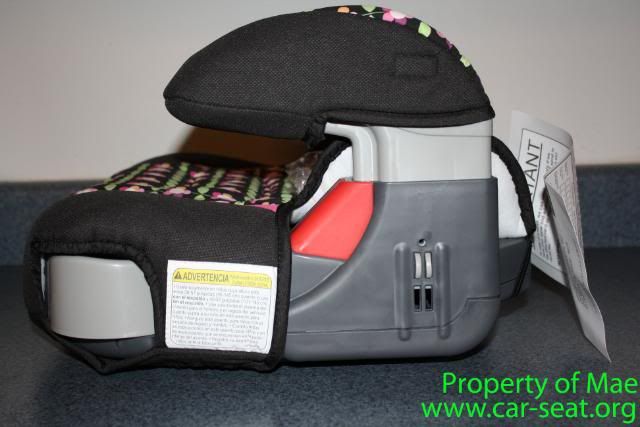
This is what the side of the TurboBooster looks like if there are not any screws installed in the armrest
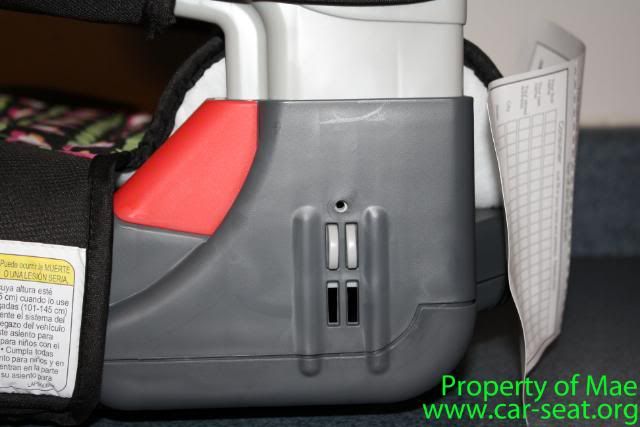
This is what it should look like with the screws installed.
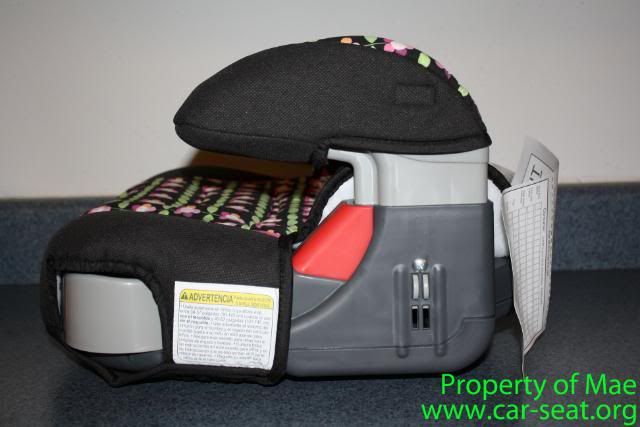
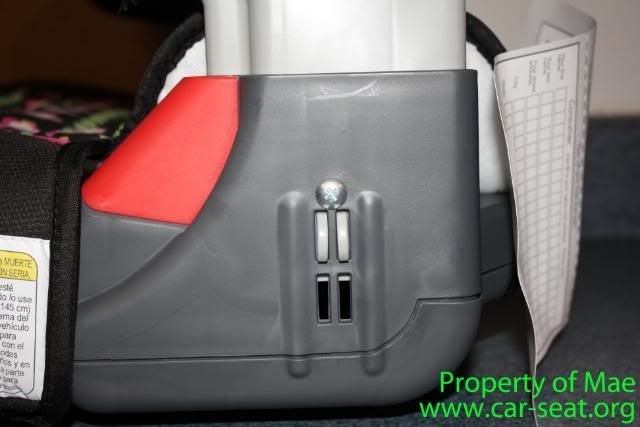
Why are the screws so important?
Graco is very insistent on having the screws installed. While we do not know the exact reasoning that the screws are required, there have been some theories tossed around. Please note that these are only theories. One theory is that, upon impact, the incredible strength of the crash forces may cause the armrests to detach from the booster. This poses a problem because the armrests are what act as a child's hip bones. If the armrests are not acting as the hip bones, the seat belt may slide up onto the child's soft tummy, where it can severely damage, injure, crush, or cut internal organs. Or, perhaps the seat failed testing without the screws installed, or maybe it was not tested at all and we just do not know what will happen. If it has not been tested without the screws, then I am not willing to use my child as the crash test dummy to find what out WILL happen.
Either way, we do not know exactly why the screws must be installed -- All we know is that Graco requires it, and they absolutely forbid the use of the TurboBooster without the screws properly installed.
My TurboBooster doesn't have screws! What do I do?
If you do not have the screws installed and you have lost them, I recommend calling Graco (800-345-4109 (US) and 800-667-8184 (Canada) ) or go to Graco's website -- the Replacement Parts search and put in your Model Number and Date of Manufacture and underneath the option, "Height adjustment screw for armrest (1 of 2)", click on two (you need two screws for each seat) and they will send you free screws -- free shipping and everything. They should arrive within a week or two, depending on your location.
I do not recommend going to a store and buying screws -- You need to be able to ensure that you are using the correct screw. There are many different shapes, sizes, and lengths. Ordering (for free!) directly from Graco is the best way to ensure that you have the correct screw, and you will know your seat will function properly.
The Date of Manufacture, Model Number, and Serial Number (if required) can be found on the bottom of your booster seat, on a white sticker.
*This was taken directly from a post at www.car-seat.org, and used with permission of the original poster*
Sunday, October 31, 2010
How to keep your baby warm in the car
You read that coats are not safe for children in carseats. But what about your baby that goes in and out of the car in her seat? How do you keep her warm? You have several options, and some are better than others.
Many Moms love the JJ Cole Bundle Me. It has a plush bottom layer that goes under the baby, in the carseat. The bottom layer has vertical cut outs for the harness to come through, then you buckle Baby, then there's another plush layer that goes over top of Baby. Sounds warm and toasty, right? Sounds dangerous to me. There are 2 problems with the Bundle Me.
1- The bottom layer can compress in a crash, leaving the harness too loose. You don't want anything plush between baby and the carseat.
2- The vertical cut outs can prevent the harness from laying properly on Baby's shoulders. If the harness isn't laying properly, there's a potential for injury.
So, is the poor baby left to freeze going from the house to the car? No! Fear not, I always have other options for you :)
Option 1- Carseat cover. It is a cover that goes over the top of the carseat, and zips up the front. It does not go behind Baby, and it doesn't even come close to touching the harness.
Option 2- Blankets. Tuck blankets around Baby to keep her warm and toasty.
Option 3- Polar Fleece. Just like I suggested using a fleece for your older child, you can use a fleece for baby too. Lands End, LL Bean, Columbia, just to name a few, all make a polar fleece that will keep baby warm, without adding bulk.
Opton 4- Cut the back out of the Bundle Me. If you cut the back off, it won't be under Baby, and it won't interfere with the harness.
Now, just remember that as the heater in the car warms up, Baby may overheat. She can't regulate her temperature as well as adults can. So keep that in mind when you're deciding which option to use.
Sunday, October 24, 2010
Oh, how Graco loves to confuse us
How many carseats can Graco make with the same name? The Graco Snugride is such a popular seat, they decided to play off the name to sell more seats. Here, I will try to explain the various seats to you.
Graco Snugride. It is nicknamed the SR22. It can be used up to 22 pounds. This is the rear adjust version. You must tighten and loosen the harness on the back of the seat, every time you take baby in and out. When looking online, you can tell which seats are the rear adjust because there's not harness adjuster strap hanging off the front (see next pic).

This is the SR22, front adjust. To loosen and tighten the harness, it's all on the front of the seat, near baby's legs. You can see the harness adjuster strap hanging down in the front.

Next came the Safe Seat 1. It is nicknamed the SS1. It can be used up to 30 pounds. It has a taller shell than the SR22. The base also has a lockoff, that makes installation in most vehicles a dream. The SS1 was discontinued a year or 2 ago. You can still find it for sale on some websites, so be aware, they likely have an older date of manufacture (and hopefully the price will reflect that).

When Graco discontinued the SS1, they created the Snugride 32, nicknamed SR32. It looks exactly like the SS1, base and all. THe only way to tell the difference is to read the labels on the carrier and base. THis seat didn't last very long, less than 1 year. Again, it can still be found on some websites, but there will be no new date of manufactures.

The SR32 was discontinued for the Snugride 35, nicknamed SR35. Again, it looks just like the SR32 and SS1. The only way to tell the difference is to read the labels. However, It looks like Graco changed their infant padding from just a headrest, to a body support with this model.

Now Graco is releasing a Snugride 30, nicknamed SR30. It is an entirely different seat. The base does not have lockoffs. Unlike the other Snugrides which all start at 5 pounds, this seat can be used for a 4 pound infant. It also has a lower harness slot, and closer crotch buckle slot to fit tiny babies better.

Graco Snugride. It is nicknamed the SR22. It can be used up to 22 pounds. This is the rear adjust version. You must tighten and loosen the harness on the back of the seat, every time you take baby in and out. When looking online, you can tell which seats are the rear adjust because there's not harness adjuster strap hanging off the front (see next pic).

This is the SR22, front adjust. To loosen and tighten the harness, it's all on the front of the seat, near baby's legs. You can see the harness adjuster strap hanging down in the front.

Next came the Safe Seat 1. It is nicknamed the SS1. It can be used up to 30 pounds. It has a taller shell than the SR22. The base also has a lockoff, that makes installation in most vehicles a dream. The SS1 was discontinued a year or 2 ago. You can still find it for sale on some websites, so be aware, they likely have an older date of manufacture (and hopefully the price will reflect that).

When Graco discontinued the SS1, they created the Snugride 32, nicknamed SR32. It looks exactly like the SS1, base and all. THe only way to tell the difference is to read the labels on the carrier and base. THis seat didn't last very long, less than 1 year. Again, it can still be found on some websites, but there will be no new date of manufactures.

The SR32 was discontinued for the Snugride 35, nicknamed SR35. Again, it looks just like the SR32 and SS1. The only way to tell the difference is to read the labels. However, It looks like Graco changed their infant padding from just a headrest, to a body support with this model.

Now Graco is releasing a Snugride 30, nicknamed SR30. It is an entirely different seat. The base does not have lockoffs. Unlike the other Snugrides which all start at 5 pounds, this seat can be used for a 4 pound infant. It also has a lower harness slot, and closer crotch buckle slot to fit tiny babies better.

Sunday, October 17, 2010
Leg room rear facing
Children don't complain about their legroom (or lack thereof) when they are rear facing. But, parents often want them to ahve the most legroom they can. So, I used my daughter, who was 3 years 3 months old at the time as a model. I installed many convertibles in my van. The van's seatbacks were all set to the same spot, so any variance in legroom is purely because of the carseat itself.
Safety 1st Complete Air:

Evenflo Triumph Advance:

Evenflo Symphony:

Britax Marathon:

Graco My Ride:

Sunshine Kids Radian:

The First Years True Fit Premiere:

Evenflo Titan:

Evenflo Tribute:

Safety 1st Complete Air:

Evenflo Triumph Advance:

Evenflo Symphony:

Britax Marathon:

Graco My Ride:

Sunshine Kids Radian:

The First Years True Fit Premiere:

Evenflo Titan:

Evenflo Tribute:

Sunday, October 10, 2010
The newest 40 pound rear facing seat
Cosco has slightly redesigned the Scenera. Right now, the Scenera 40RF is only available at Target, but will soon be headed to other stores as well. Currently, all other stores have the Scenera that rear faces to 35 pounds.


Safety experts agree: Babies should remain rear-facing as long as possible.The Scenera® 40RF is helping parents meet this goal with a convertible car seat that can remain rear-facing all the way to 40 pounds and 43 inches in height.
- Rear-facing 5-40 pounds
- Forward-facing 22-40 pounds
- 5-point harness system with up front adjustment
- 4 harness heights
- 3 buckle locations
Saturday, October 2, 2010
How to wear a winter coat in the carseat
With winter around the corner, I imagine most parents are looking for a warm winter coat for their children. Something to keep in mind, is carseat safety. Many winter coats are not safe to use when your child is riding in a carseat. Below is a demo of how to keep your child warm and safe in the car.

Here is a child, properly buckled into his carseat.

You can see it's properly tightened. The harness should be tight enough that when you try to pinch a horizontal line at the shoulders, you can't pinch any.

Here is a child wearing an average winter coat, buckled into his carseat.

He unbuckled, without loosening the harness, and removed his coat. Now you can clearly see how much slack that coat allowed in the harness. In a crash, the puffy coat would compress, and this his how loose he would be.

One option is to buy a polar fleece. It is plenty warm, but not thick and bulky.

A second option is to do the "carseat trick". You unzip the coat, and pull the sides out of the harness

Next, buckle the child, and tighten properly. This is often enough to keep the children warm, especially once the heater gets going.

Another optional step, is to rezip the coat over the harness.
I'm currently shopping for Sofi's winter coat. I'm ordering a fleece from Lands End, overstocks. I've had to order a few to find the coat I like, in the right size. Once her coat arrives, I will post some pictures of her in it.

Here is a child, properly buckled into his carseat.

You can see it's properly tightened. The harness should be tight enough that when you try to pinch a horizontal line at the shoulders, you can't pinch any.

Here is a child wearing an average winter coat, buckled into his carseat.

He unbuckled, without loosening the harness, and removed his coat. Now you can clearly see how much slack that coat allowed in the harness. In a crash, the puffy coat would compress, and this his how loose he would be.

One option is to buy a polar fleece. It is plenty warm, but not thick and bulky.

A second option is to do the "carseat trick". You unzip the coat, and pull the sides out of the harness

Next, buckle the child, and tighten properly. This is often enough to keep the children warm, especially once the heater gets going.

Another optional step, is to rezip the coat over the harness.
I'm currently shopping for Sofi's winter coat. I'm ordering a fleece from Lands End, overstocks. I've had to order a few to find the coat I like, in the right size. Once her coat arrives, I will post some pictures of her in it.
Friday, August 6, 2010
Adventures in Retrofitting Tether Anchors
It is extremely important to use tether anchors when you're carseat is forward facing. Did you know that if your car doesn't have tether anchors, you can often have them retrofitted? If you don't know how to go about doing this, read you car's manual. It is very important that you know where the anchors should be, here's my story.....
My mother drives a 1999 Ford Escort Wagon. Sofi is currently rear facing in her car, but one day she will be forward facing. We decided to have the tether anchors installed, so we're ready when that forward facing day comes. I call the Ford dealership of my mother's choice. The dealership ordered the anchors, and called her once they came in, and set up an appointment. My mother had them installed, and I took a look after it was done. According to the 2009 LATCH Manual, the tether anchors should go in the ceiling. Where did Ford install them? On the floor. How odd. I checked the car's owner's manual, and spoke with some CPSTs online, and we decided that they were installed incorrectly. I spoke with the dealership twice, and will soon be going to have them reinstalled. I will be going with my mother this time, to make sure they are placed correctly.
My mother drives a 1999 Ford Escort Wagon. Sofi is currently rear facing in her car, but one day she will be forward facing. We decided to have the tether anchors installed, so we're ready when that forward facing day comes. I call the Ford dealership of my mother's choice. The dealership ordered the anchors, and called her once they came in, and set up an appointment. My mother had them installed, and I took a look after it was done. According to the 2009 LATCH Manual, the tether anchors should go in the ceiling. Where did Ford install them? On the floor. How odd. I checked the car's owner's manual, and spoke with some CPSTs online, and we decided that they were installed incorrectly. I spoke with the dealership twice, and will soon be going to have them reinstalled. I will be going with my mother this time, to make sure they are placed correctly.
Friday, July 30, 2010
It's been too long
Wow, I can't believe I haven't blogged since March! I'm so sorry I haven't kept everyone up to date, but life has thrown me some curve balls. So many new seats have come out, watch for more info coming.
Monday, March 1, 2010
Q & A: Britax Marathon
 Q: What are your thoughts on the Britax Marathon or Boulevard?
A:
I bought my first Marathon a year ago. A few months later, I bought a Boulevard because I got a great price on it. I love how easily they install with LATCH. I love all the different covers I can buy to refresh the seat a bit. However the Britax convertibles don't have much leg
 room for older rear facing kiddos. That is not a deal breaker for me, but the seats moved to the Grandparents' cars so I could get a seat with more legroom for her primary ride. There are more seats out now with a higher RF weight limit, and more seats with more legroom. Would I spend the money on another Britax convertible? No. I can get other seats with higher weight limits for less money, or seats with higher weight limits, taller top slots, and a taller shell for about the same money.
Friday, February 5, 2010
Is your True Fit tether hook "broken"?
Have you looked at the tether hook on your True Fit? If it's forward facing, I hope you have. If it's rear facing, maybe now is the time to look at it. We have noticed that the Tether hooks on some True Fit and True Fit Premier carseats are not bent correctly. At first, Learning Curve was replacing seats, as the tether is not replaceable. Learning Curve realized how wide spread this problem may be, and designed a fix for it.

This is what a tether hook should look like.

This is what the "broken" tether hook looks like. See how the thin metal piece is up further then in the first picture? Like this, it may not hold like it should in a crash.

This is the fix that Learning Curve has made. It's a piece of plastic that you put on the tether hook to help bend it into position.

This is what the hook looks like with the plastic piece on it.
If your True Fit tether hook is not shaped correctly, gather the information from the carseat. You'll need the date of manufacture, and model number. Then call Learning Curve and explain about the tether hook.

This is what a tether hook should look like.

This is what the "broken" tether hook looks like. See how the thin metal piece is up further then in the first picture? Like this, it may not hold like it should in a crash.

This is the fix that Learning Curve has made. It's a piece of plastic that you put on the tether hook to help bend it into position.

This is what the hook looks like with the plastic piece on it.
If your True Fit tether hook is not shaped correctly, gather the information from the carseat. You'll need the date of manufacture, and model number. Then call Learning Curve and explain about the tether hook.
Subscribe to:
Posts (Atom)