CuddleBabe was kind enough to give me a sample to review. I asked for a 9-18 month because the model is 9 months and I wanted this to get her through the winter. The CuddleBabe is a wearable blanket that is SAFE to use in the carseat.
You put the CuddleBabe in the carseat, with the hole where the harness is.
Then you put baby in. Put baby's head in the hat, and legs in the legs of the blanket.
Fold the body flap up over baby's body
Wrap the sides around baby, and button the blanket closed.
This blanket does not interfere with the harness at all, so it's safe to use. It warps around baby and buttons (with a BIG button, not a choking hazard) so baby can't kick it off. I had my model use CuddleBabe for a week before asking what her Mom thought of it. And what did she think? She LOVED IT!! She said everyone loved it and was asking where she got it :)
CarseatNanny loves the CuddleBabe! CuddleBabe must love CarseatNanny too, because they have offered a discount just for my readers! Enter the code carseatnanny at checkout for 10% off your purchase!
Friday, November 18, 2011
Friday, October 28, 2011
Keeping Baby warm in the car
Fall is here, and winter is quickly approaching. The air is getting cooler. How do you keep your baby warm in the car? Baby can not wear a puffy coat in the car. The puffiness will keep you from getting the harness tight enough, and when it compresses in a crash, baby may be ejected from the seat. Here is a look at some options.
Here is an adorable baby. She's about 8 months old in this picture, and she rides in a Graco Snugride. Here she is wearing her coat. The coat is actually a fairly thin fleece, but it's a size or 2 too big (I think it's actually cut large).
Here she is, wearing the coat in her carseat. I've buckled her in, and tightened the harness as much as the coat allows me to.
Here, I took her out of the carseat, without loosening the harness. I took her coat off, and put her back in without adjusting the harness.
When a harness is properly tightened, you shouldn't be able to pinch any of it. Your fingers should just slide off. You can see in this photo how much I am able to pinch
A thin fleece that is too big is just as bad as a puffy coat. A thin fleece is safe, as long as it fits the child snugly.
Here is a good option. There are carseat covers that go over top of the carseat like a hairnet. These don't interfere with the harness, and don't prevent you from getting the harness tight enough.
Lula Clips Review
First, I want to thank the creator of Lula Clips for kindly sending me a sample to use and review. I had heard about them at the ABC trade show, and wanted to check them out. I was actually very excited.

What are Lula Clips? They are orange pins, shaped like hands. They attach to the carseat with a safety fin, attached to their back. You pin it on the carseat cover, and put the buckle tongues (the metal pieces that go in the crotch buckle) on the hands. The hands have a strong magnet inside, so ideally the keep the harness out of the way while you put the baby/child in the carseat.
From their site:
I tried it on my daughter's Radian. I wasn't terribly fond of it. I take excellent care of my carseats and their covers. I didn't like putting holes in the cover. And there is a safety feature to the safety pin, so you must use 2 hands to open the pin. I felt like trying to get it off my seat, I was going to rip a huge chunk out of my cover :(


I also tried it on a friend's infant carseat. I had her use it for a week, to see what she thought. I thought it was easier to get on and off the infant seat, perhaps because I could flip the seat around however I wanted (without baby in, obviously). My friend said she didn't like the clips much either :(


I know on the website, they put the clips up near the baby's head. I chose to put them lower because in a crash, I don't want anything extra near my child's head.

What are Lula Clips? They are orange pins, shaped like hands. They attach to the carseat with a safety fin, attached to their back. You pin it on the carseat cover, and put the buckle tongues (the metal pieces that go in the crotch buckle) on the hands. The hands have a strong magnet inside, so ideally the keep the harness out of the way while you put the baby/child in the carseat.
From their site:
Lulaclips™ hold the car seat harness out of the way when loading your child. They are like an extra set of hands when you need it most. Lulaclips™ ensure that you never have to dig the buckles out from under your child and make sure you never risk waking a sleeping baby. They will make you and your baby smile!
I tried it on my daughter's Radian. I wasn't terribly fond of it. I take excellent care of my carseats and their covers. I didn't like putting holes in the cover. And there is a safety feature to the safety pin, so you must use 2 hands to open the pin. I felt like trying to get it off my seat, I was going to rip a huge chunk out of my cover :(


I also tried it on a friend's infant carseat. I had her use it for a week, to see what she thought. I thought it was easier to get on and off the infant seat, perhaps because I could flip the seat around however I wanted (without baby in, obviously). My friend said she didn't like the clips much either :(


I know on the website, they put the clips up near the baby's head. I chose to put them lower because in a crash, I don't want anything extra near my child's head.
Sunday, October 9, 2011
Clek Oobr
The Oobr is a high back booster seat made by Clek. It is for children weighing 33-100 pounds in high back mode and 40-100 pounds in backless mode. The back is made from magnesium, and the headrest is attached with steel rods, just like your vehicle headrest. It has lower anchors to lock the booster into place with your vehicle's LATCH system.
I managed to get my hands on an Oobr to try out. First I tried a friend's daughter. She is 6 years old and weighs 45 pounds.


Then I tried Sofi. She's 5 years, 35 pounds.


Sofi is too light to be using a booster, but I am beginning to look at my options for when she is 40 pounds. So, what are my thoughts? I love that it's LATCHable, so kids don't have to remember to buckle it when they get out. I love how sturdy it is. Unfortunately, it's nearly impossible to buckle next to the Frontier 85 in my van, and the girls didn't think it was comfortable. The lapbelt is higher than we usually like to see with booster (though still acceptable). There is very little leg support, except for my short legged 5 year old. It was also very difficult to pull the shoulder belt through the belt guide when trying to buckle. All that combined with a price around $300, puts it at the bottom of my list.
I managed to get my hands on an Oobr to try out. First I tried a friend's daughter. She is 6 years old and weighs 45 pounds.


Then I tried Sofi. She's 5 years, 35 pounds.


Sofi is too light to be using a booster, but I am beginning to look at my options for when she is 40 pounds. So, what are my thoughts? I love that it's LATCHable, so kids don't have to remember to buckle it when they get out. I love how sturdy it is. Unfortunately, it's nearly impossible to buckle next to the Frontier 85 in my van, and the girls didn't think it was comfortable. The lapbelt is higher than we usually like to see with booster (though still acceptable). There is very little leg support, except for my short legged 5 year old. It was also very difficult to pull the shoulder belt through the belt guide when trying to buckle. All that combined with a price around $300, puts it at the bottom of my list.
Tuesday, October 4, 2011
Product reviews to come....
Wow, it's been over a month since I blogged. Well, the good new is good things come to those who wait. I have a few product reviews lined up. I will be reviewing Lula Clips, the Diono Angle Adjuster, Clek Oobr, and the Graco Turbo booster.
Saturday, August 27, 2011
Who is Diono?
Sunshine Kids makes 2 seats. The Radian (65, 80, XT, 65SL, 80SL, XTSL) and the Monterey. In an attempt to become a more global company, they have decided to change their name. Sunshine Kids Juvenile Products will be Dinono as of Sept 1, 2011. They are also changing their seats a bit, once again. The new seats should be released in October 2011. Their Radians will be getting new names, and will have belt guides to provide for booster mode. They will have a minimum weight of 50 pounds for booster mode, and a maximum of 100-120 pounds (depending on which Radian it is). If you are confused by their seats, look for a future blog post explaining them all.
Now, here's the big question. How do you pronounce 'Diono'?
Now, here's the big question. How do you pronounce 'Diono'?
Sunday, June 12, 2011
Comparing the BubbleBum to other seats
Here are some comparison pictures, to see how small the BubbleBum really is.
Here is the BubbleBum sitting on a RadianXT. The Radian is 17 inches at it's widest point. The BubbleBum is about 12 inches wide.

Here is the BubbleBum sitting in a Graco TurboBooster. The backs of the 2 boosters are even, so you can see the difference in leg support.

Here is the BubbleBum sitting on a RadianXT. The Radian is 17 inches at it's widest point. The BubbleBum is about 12 inches wide.

Here is the BubbleBum sitting in a Graco TurboBooster. The backs of the 2 boosters are even, so you can see the difference in leg support.

Saturday, May 28, 2011
BubbleBum Inflatable Booster Seat
You read right, INFLATABLE booster seat. I admit, I was a skeptic. How on earth could something inflatable be safe for my child in the car? But if you think about it, some other safety devices are inflatable; life rafts for one. The BbbbleBum is made of thick plastic, similar to a life raft. The cover is also an integral part of the seat. The cover has straps around it made of webbing, similar to that of seatbelts.
The BubbleBum comes deflated, in a purple bag. You take it out of the bag, and open the black valve. Blow into the valve to fully inflate the seat, then close the valve. I found that after inflating it the first time, it will mostly inflate itself in the future. It has seat belt positioning clips on each side that the child places the lap portion of the lap/shoulder belt in. Those position the lap belt just like the arm rests would on other booster seats. The US version comes with a shoulder belt positioning clip too. The Bubble Bum measures 12-12.5 inches across, and about 13 inches from back to front when fully inflated.
The BubbleBum is rated for children 40-80 pounds and between 40- 52 inches tall.
Here are 3 children modeling seatbelt fit.
This child does not ride in a booster seat at all. She is only 4 years old and no where near mature enough, she still rides harnessed. But she weighs 40 pounds.

This child is 6 years old and 42 pounds. She regularly rides in backless boosters. I hope to have some comparison shots of her in other boosters in the next few weeks. It doesn't look to provide alot of leg support.


This child is 8 years old and 84 pounds. While she does not fit by weight and therefore can't use the seat, I wanted to demonstrate a child at the top of the weight limit. She actually passes the 5 step test in this seating position and doesn't normally use a booster there at all. It doesn't seem to position the seatbelt any differently than if she wasn't in a booster seat.


I also plan to have picture of this booster in a 3 across in my 3rd row in a few weeks as well, so keep checking back!
The BubbleBum comes deflated, in a purple bag. You take it out of the bag, and open the black valve. Blow into the valve to fully inflate the seat, then close the valve. I found that after inflating it the first time, it will mostly inflate itself in the future. It has seat belt positioning clips on each side that the child places the lap portion of the lap/shoulder belt in. Those position the lap belt just like the arm rests would on other booster seats. The US version comes with a shoulder belt positioning clip too. The Bubble Bum measures 12-12.5 inches across, and about 13 inches from back to front when fully inflated.
The BubbleBum is rated for children 40-80 pounds and between 40- 52 inches tall.
Here are 3 children modeling seatbelt fit.
This child does not ride in a booster seat at all. She is only 4 years old and no where near mature enough, she still rides harnessed. But she weighs 40 pounds.

This child is 6 years old and 42 pounds. She regularly rides in backless boosters. I hope to have some comparison shots of her in other boosters in the next few weeks. It doesn't look to provide alot of leg support.


This child is 8 years old and 84 pounds. While she does not fit by weight and therefore can't use the seat, I wanted to demonstrate a child at the top of the weight limit. She actually passes the 5 step test in this seating position and doesn't normally use a booster there at all. It doesn't seem to position the seatbelt any differently than if she wasn't in a booster seat.


I also plan to have picture of this booster in a 3 across in my 3rd row in a few weeks as well, so keep checking back!
Thursday, March 31, 2011
Proper Seatbelt Fit Matters
Hopefully you read my post about Anne's crash. If you didn't, please read it here. Anne's children were protected because of their properly used and properly installed carseats. But Jeff and Anne were protected because of their properly used seatbelts.
Most of us don't think about how the seatbelt is supposed to fit. But it is designed for the lap portion to ride over your hip bones, and the shoulder portion to cross your chest and rest between your shoulder and neck.
The oldest age that states require a child to use a booster is 8. There are very few 8 year olds that actually fit the seatbelt properly. A child needs to use a booster seat until they can pass the 5 step test. Children usually pass all 5 steps between ages 10 and 12. Does your child pass?
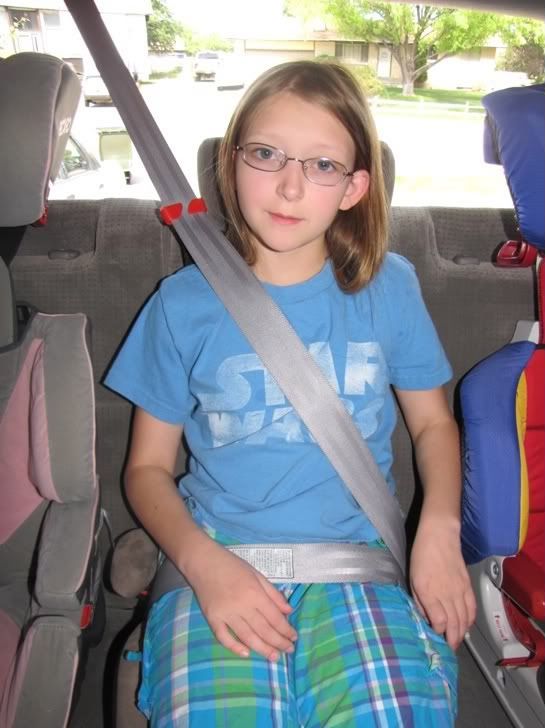
If your child doesn't fit the belt properly, use a booster. If you pass the test, make sure your belt is worn properly- coming from above the shoulder, across the middle, touching your body all the way down, the lap belt low and snug, flat on the hips/thighs. Keep it there. If you're old enough to be out of a harness, you're old enough that you are responsible for your safety in the car. ONLY YOU can keep yourself safe by wearing your belt right.
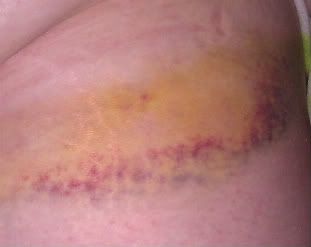
Here is a picture of a bruise on Anne's hip. This was from a properly fitting seatbelt. This is also 5 days after her crash. If the lap portion had been higher on her stomach, it would have caused internal organ damage.
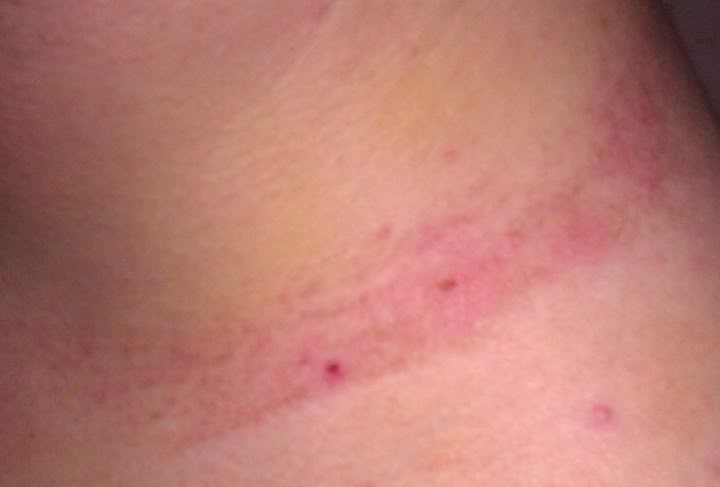
This is a picture of Jeff's shoulder, also 5 days after the crash. The hospital was concerned enough to CT his shoulder. Because his belt was properly positioned in the middle of his shoulder, in contact all the way across his chest, coming from above rather than below, it was only scrapes and bruises. What if it had been on his neck instead? Or if he had had it too low on his shoulder and rolled out? What if he had tucked it under his arm and left his head unrestrain
Most of us don't think about how the seatbelt is supposed to fit. But it is designed for the lap portion to ride over your hip bones, and the shoulder portion to cross your chest and rest between your shoulder and neck.
The oldest age that states require a child to use a booster is 8. There are very few 8 year olds that actually fit the seatbelt properly. A child needs to use a booster seat until they can pass the 5 step test. Children usually pass all 5 steps between ages 10 and 12. Does your child pass?
1. Sit with your back flat against the vehicle seatback
2. Knees bend comfortably over the edge of the vehicle seat
3. Lap belt lays across the tops of the thighs, not on the stomach
4. The shoulder belt crosses the center of the chest, and rests between the shoulder and neck
5. You can sit this way for the entire ride

If your child doesn't fit the belt properly, use a booster. If you pass the test, make sure your belt is worn properly- coming from above the shoulder, across the middle, touching your body all the way down, the lap belt low and snug, flat on the hips/thighs. Keep it there. If you're old enough to be out of a harness, you're old enough that you are responsible for your safety in the car. ONLY YOU can keep yourself safe by wearing your belt right.
Here is a picture of a bruise on Anne's hip. This was from a properly fitting seatbelt. This is also 5 days after her crash. If the lap portion had been higher on her stomach, it would have caused internal organ damage.

This is a picture of Jeff's shoulder, also 5 days after the crash. The hospital was concerned enough to CT his shoulder. Because his belt was properly positioned in the middle of his shoulder, in contact all the way across his chest, coming from above rather than below, it was only scrapes and bruises. What if it had been on his neck instead? Or if he had had it too low on his shoulder and rolled out? What if he had tucked it under his arm and left his head unrestrain

Monday, March 28, 2011
Why I do what I do
Most of you know I'm carseat crazy. You may even think I'm bordering (or even crossed the border) on carseat insane. But do you know why I do what I do? Because it saves lives. How many times do we see on the news that children, parents, families died in a horrible car crash. My job is to try and prevent those stories. I have a friend, named Anne. Anne is just as carseat crazy as I am. What I am posting below, is her story. She and her family were in a crash a few days ago. They could have easily been one of those stories on the news. But they weren't, because Anne is carseat crazy. Make sure you read the entire thing. Read how many times they crashed and rolled. And read what the (very few) injuries were. Then look at the pictures.
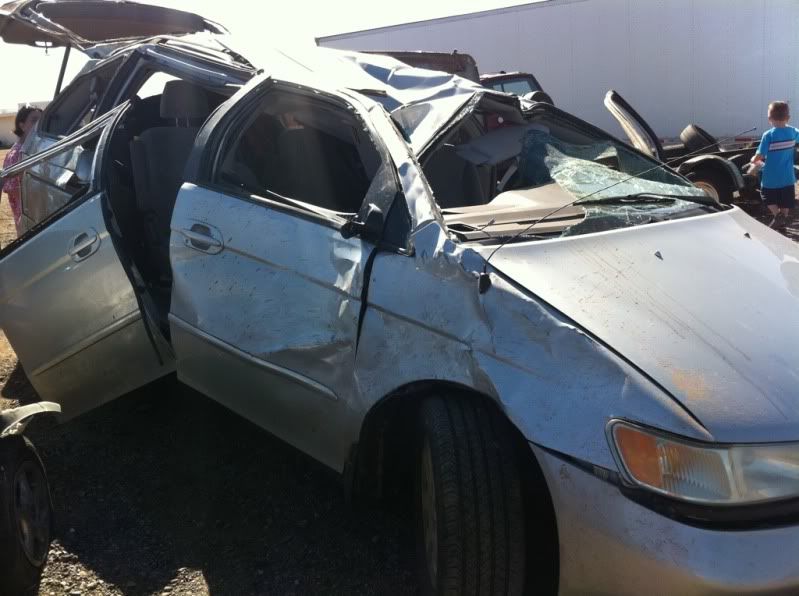
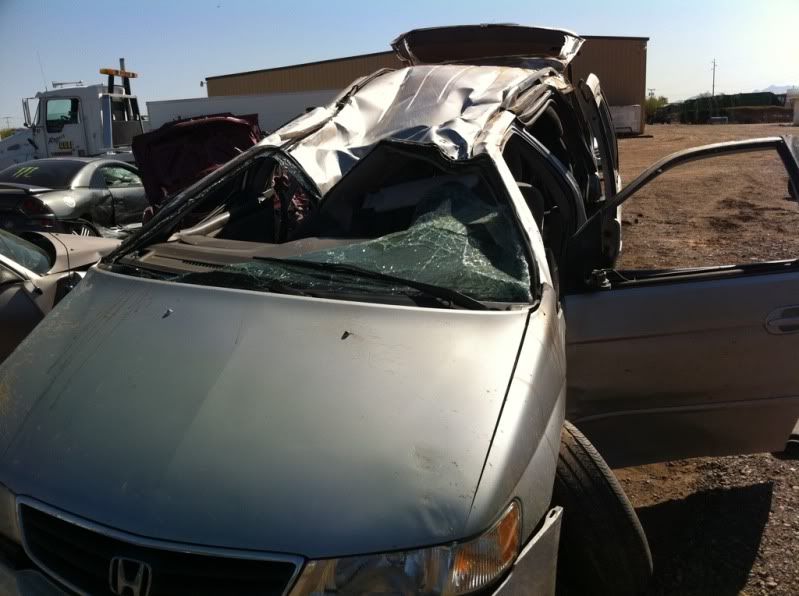
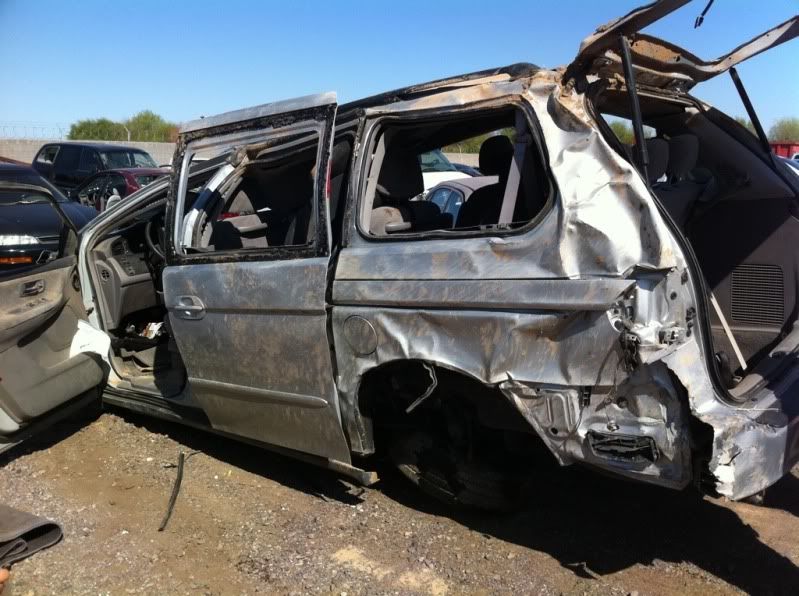
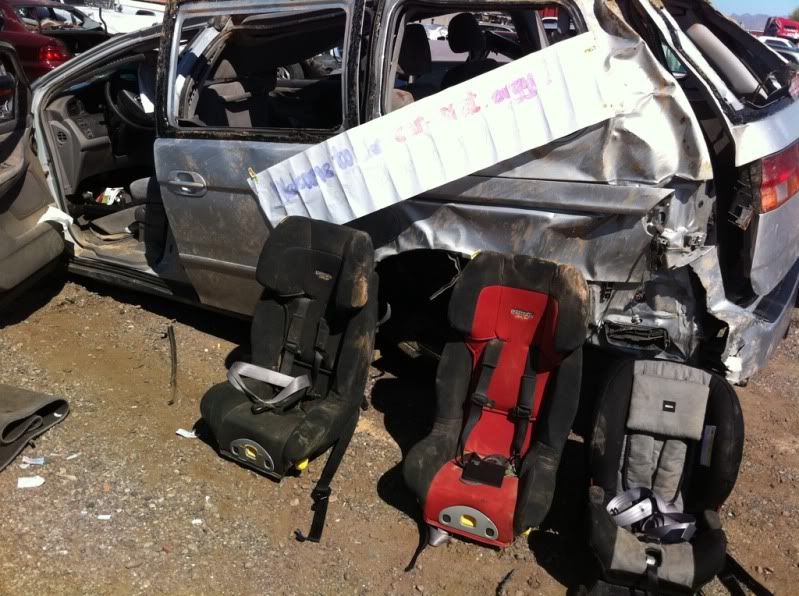
Anne said aside from the dirt, the carseats looked perfectly fine. THIS is why you can't buy used carseats, you won't know if it's been in a crash. Even though they look fine, they have done their job and must be replaced.
I was asked to add to this blog post. It is doing it's job and spreading information. However, some people are turning it into an "anti-booster" message. Anne's 6 year old is usually in a booster, except on a trip where she might fall asleep (and lean out of position). Anne was asked if she would reconsider the booster, and put her daughter into a 5 point harness for all car rides. This is her response:
Here is a link to a photobucket account that has more pictures of the van and carseats.
One more addition to this post. Anne wants everyone to know that proper seatbelt fit matters. With her help, I have posted information on seabelt fit here.
On our way to Phoenix, just a few miles away, my husband (driving our 2002 Odyssey) hit an obstacle in the road. We don't know what it is, but we all felt the bump, then were airborne, and onto a gravel shoulder. We skidded on the gravel. The van hit a barrier (right at the rear driver's side, where my 4 year old daughter was seated.) It then flipped across the highway. My husband was braking the whole way. (He had just had the tires rotated and pressure checked, and the brakes replaced.) It slowed us considerably. We went into a ditch at an angle and became airborne. We went down on the passenger side of the vehicle, nose first, and then flipped over upside down.
My daughters (the 4 year old, almost 5, and her 2 sisters, 6 almost 7 and 2 almost 3) were screaming. This meant they were alive and I was glad. My husband and I were suspended by our (properly worn) seatbelts. I had significant neck pain. My husband was able to exit the vehicle fairly easily, but I was trapped; I had to be extracted with the Jaws of Life (after fending off a bystander who wanted to cut my belt with a pen knife and pull me out, yelling at him, "Do not cut my seatbelt! Wait until the EMTs arrive to hold c-spine! If you want to do something, get me a jacket and treat me for shock!")
My 4 and 6 year olds were harnessed properly in properly installed and used, tethered seats. (The 6 year old is usually boostered, but because it was a late night trip I didn't want to risk her falling asleep and falling out of position.) My 2 year old was rear-facing. The heavy cargo in the van was all packed tightly down in the bottom of the trunk, compartmentalized behind and under the seat as much as possible before we left. My husband and I had our seatbelts and headrests properly fastened and adjusted and were seated in proper position.
My husband has a mild lung contusion and abrasions from his seatbelt and "road burn." I have a lot of stitches in my arm (which dragged along the ground outside the car-- the trauma surgeon says that the braking slowed us enough to save me from having it ripped off) and on my face and bruising all over. My 6 year old has minor abrasions (more road burn) and bruises. My 4 year old, with the most severe injuries, suffered a severe cut to her foot (aptly and completely repaired by great surgeons) and a broken leg (remember, she was AT the first point of impact, a side impact.) My 2 year old, who was in the rear-facing seat, was completely unharmed. Not a mark on her. Nothing. Despite the fact that we landed on the side of the car she was on (she was behind me, I was in the second row passenger seat, and the forward-facers were second and third row driver's side.)


Anne said aside from the dirt, the carseats looked perfectly fine. THIS is why you can't buy used carseats, you won't know if it's been in a crash. Even though they look fine, they have done their job and must be replaced.
I was asked to add to this blog post. It is doing it's job and spreading information. However, some people are turning it into an "anti-booster" message. Anne's 6 year old is usually in a booster, except on a trip where she might fall asleep (and lean out of position). Anne was asked if she would reconsider the booster, and put her daughter into a 5 point harness for all car rides. This is her response:
My view on boosters has not changed. The reason that she was in a harness, was that she was likely to fall asleep, and she sometimes slumps when she does. She will still be boostered for normal use.
My view has always been that boosters are safe for a child who can stay seated properly 100% of the time, and that was not E (6, almost 7) on a long trip, and B (4, almost 5) is no where near it. So they were harnessed. If this same crash had happened and E was in a booster but asleep and slumped, she'd have been more hurt.
I think by 6 most but not all kids are booster ready for most trips, but most are NOT before 5. I think moving from harness to booster is ideally a process where you use the harness less and booster more as the kid gets more ready, until they're ready 100% of the time (even when asleep.)
Here is a link to a photobucket account that has more pictures of the van and carseats.
One more addition to this post. Anne wants everyone to know that proper seatbelt fit matters. With her help, I have posted information on seabelt fit here.
Saturday, March 5, 2011
Graco Smart Seat, forward facing
Here is a side view of Sofi riding in the seat forward facing. She uses it on harness position 5 (out of 6)

Here is a front view of Sofi, harness position 5. I'm not really a fan of how high the headrest is. It looks like it needs to be lowered.

The harness is connected to the headrest. So if you raise and lower 1, you raise and lower the other. Here is how Sofi fits in harness position 4. The headrest looks much better.....

But the harness is below her shoulders :(


Here is a front view of Sofi, harness position 5. I'm not really a fan of how high the headrest is. It looks like it needs to be lowered.

The harness is connected to the headrest. So if you raise and lower 1, you raise and lower the other. Here is how Sofi fits in harness position 4. The headrest looks much better.....

But the harness is below her shoulders :(

Saturday, February 26, 2011
Graco Smart Seat, locking system
Because the seat/base is a new concept, I'm going to show how the seat locks into the base.
Here you can see 2 long slots in the side of the base. This is where a metal bar (next picture) attaches the seat to the base.

Here is the little metal bar, sticking out of the seat in lock mode. There are 4 of these on the seat. On by the knees, and one by the hips, on each side of the seat. When unlocked, the metal bar retracts into the seat shell.

There is a knob on each side of the seat to lock/unlock the seat from the base. To unlock, both knobs must be pushed in and turned at the same time. TO lock, you only have to turn 1.

There is a set of red flags in the seat to let you know when the seat is unlocked from the base. Here are 2 pictures of them unlocked:


Here is a picture of the seat when the flags are in locked position:

It's very easy to lock and unlock. But not easy enough that it would be unlocked accidentally. Even though the seat is 25 pounds (plus 10 more for the base), it's really very easy to switch from rear facing to forward facing, and back again.
Here you can see 2 long slots in the side of the base. This is where a metal bar (next picture) attaches the seat to the base.

Here is the little metal bar, sticking out of the seat in lock mode. There are 4 of these on the seat. On by the knees, and one by the hips, on each side of the seat. When unlocked, the metal bar retracts into the seat shell.

There is a knob on each side of the seat to lock/unlock the seat from the base. To unlock, both knobs must be pushed in and turned at the same time. TO lock, you only have to turn 1.

There is a set of red flags in the seat to let you know when the seat is unlocked from the base. Here are 2 pictures of them unlocked:


Here is a picture of the seat when the flags are in locked position:

It's very easy to lock and unlock. But not easy enough that it would be unlocked accidentally. Even though the seat is 25 pounds (plus 10 more for the base), it's really very easy to switch from rear facing to forward facing, and back again.
Saturday, February 19, 2011
The new Graco Smart Seat
Graco is now releasing a new seat. It's a 3-in-1. Rear facing, forward facing, and booster. What is unique about this seat is, it has a base, like infant seats. I was lucky enough to have someone loan me then Smart Seat to try out and see what I think. The next few blog posts will have my reviews.
The Smart Seat can hold 5-40 pounds rear facing, and up to 65 pounds forward facing. It also converts to a high back booster for up to 100 pounds. You install the base once, and remove the seat from the base to switch from rear facing to forward facing. Then for booster use, you just take it off the base entirely.
First up, rear facing.
My Model is my 4 year old daughter Sofi. She is 4 years, 5 months old. She weighs 34 pounds.
Here she is rear facing on the 1st recline (Note, the amount of recline will vary because different vehicle seats are sloped differently- mine are pretty flat).

Here is the level bubble on the 1st recline:

Here she is on the 2nd recline. This is as upright as we can take it in my car.

Here is the bubble level on the 2nd recline:

Here is the growing room Sofi has. There is 1.5- 1.75 inches above her head. So she has .5 inch until she has outgrown the seat by height.

The Smart seat has a pair of harness covers that have a thick wedge inside them. They are required for rear facing use. Sofi, who doesn't like harness covers to begin with, HATED them.
The Smart Seat can hold 5-40 pounds rear facing, and up to 65 pounds forward facing. It also converts to a high back booster for up to 100 pounds. You install the base once, and remove the seat from the base to switch from rear facing to forward facing. Then for booster use, you just take it off the base entirely.
First up, rear facing.
My Model is my 4 year old daughter Sofi. She is 4 years, 5 months old. She weighs 34 pounds.
Here she is rear facing on the 1st recline (Note, the amount of recline will vary because different vehicle seats are sloped differently- mine are pretty flat).

Here is the level bubble on the 1st recline:

Here she is on the 2nd recline. This is as upright as we can take it in my car.

Here is the bubble level on the 2nd recline:

Here is the growing room Sofi has. There is 1.5- 1.75 inches above her head. So she has .5 inch until she has outgrown the seat by height.

The Smart seat has a pair of harness covers that have a thick wedge inside them. They are required for rear facing use. Sofi, who doesn't like harness covers to begin with, HATED them.


